By Dr. George Hradil
Hydrofoils suffer a lot of abuse. They’re run aground; they strike objects in the water. This can lead to scratches and dents, which degrades the foil’s performance.
Most hydrofoils arrive from the manufacturer with a less than perfect surface finish.
Significant performance improvements can be achieved by sanding and maintaining your foil’s surface finish. The difference is not small and can easily be felt on the water.
Maintaining the trailing edges of your wing, stabilizer, and strut is also important for safety, and will help prevent you from being cut by your foil.
What water does at a surface and why it matters
When water slides past a solid surface, two types of flow are possible – laminar and turbulent. Turbulent flow has about 5 times the drag (resistance to movement through water) than a laminar flow. That is a huge difference. During laminar flow, water layers near the surface are stable and slide over each other like a deck of cards being spread out on a table. The layers don’t mix. In a turbulent flow, the layers aren’t stable, and do intermix. Hydrofoils are streamlined objects; the flow over a smooth streamlined object begins as laminar flow and at some point transitions to turbulent flow. Laminar flow can usually be maintained over the first third of the wing, where the wing gets thicker. At the point of maximum thickness, the wing starts to get thinner, and the flow typically transitions to turbulent.
Any imperfections on the surface of the first third of the wing can cause a premature transition to turbulent flow – and greatly increase drag. Drag is what slows you down. Therefore, it is important that the first third of the wing, as well as the strut and stabilizer, be very smooth and free of defects. The first third of the wing is the most critical, but I recommend smoothing the entire foil.
Making it happen
First, fill any dents or scratches. For large dents, I use an epoxy like JB weld. Avoid fast set epoxy glue like 5 minute epoxy. These fast set glues are too soft and don’t sand well. Pinholes and tiny scratches can be filled with glazing putty from an auto supply store.
While you’re there, buy some sandpaper.
You’ll need wet and dry sandpaper in 320, 600 and 1200 grit. You’ll also need hard and medium density sanding blocks. For the hard block, a wood paint stirrer can be used; for the medium block, I use a piece of EVA floor tile.

I always sand using water to provide lubrication and to eliminate dust. Start with 320 sandpaper and wrap it around a hard block. Sand any filler that you applied until the excess is gone and only the filler in the dents or scratches remain. Then start to sand the entire surface.
Work in a clean, well lit area, making sure there is no sand anywhere.
Place the wing on an old towel so it doesn’t slide around. Sand in diagonal strokes, alternating direction occasionally. The goal is to get a flat, defect-free surface. Wet your wing and sand paper frequently.

Most wings come with a sprayed finish, which has some orange peel surface or other defects. Decals will also cause surface irregularities. You want to sand these irregularities out. Work in small sections, occasionally drying the surface and inspecting it. You may sand into the graphics if you are not careful, so be aware. Change your sandpaper often, as it wears out. Be patient, this takes some time.
Once you have the surface flat, you can begin to smooth it by sanding with the medium density block with 600. The purpose of this step is to sand away the scratches made by the 320. Dry the surface occasionally with a clean rag to check your progress. When you no longer see scratches from the 320, switch to the 1200 with the medium block. Now you are eliminating the 600 scratches. When you’re done, the surface will be reflective at a raking angle (looking along the surface).
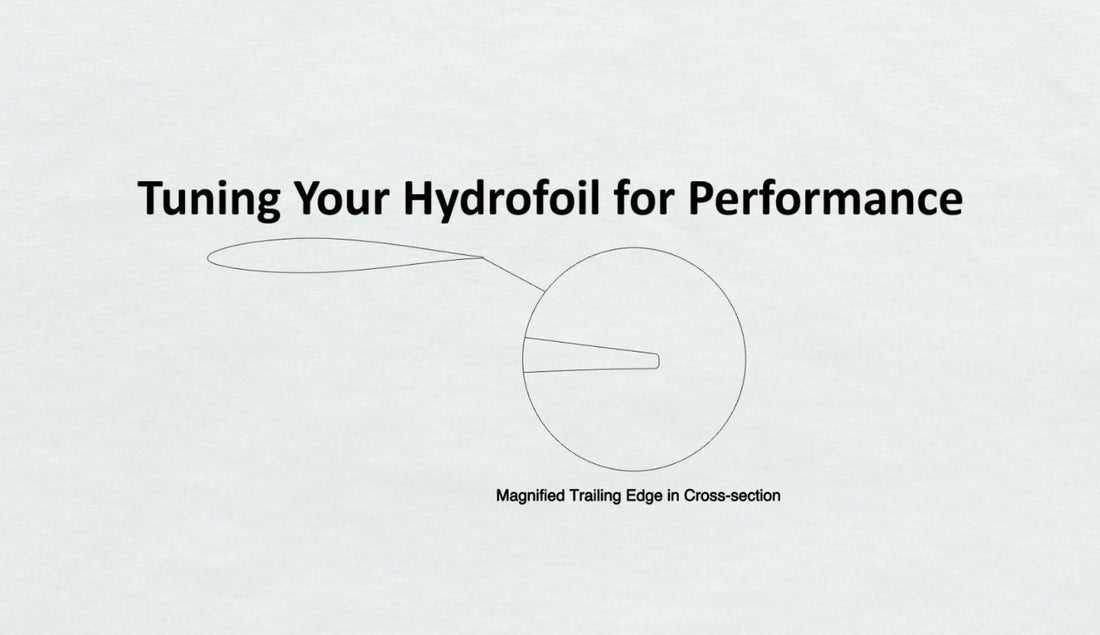
Now it’s time to give the trailing edges some attention. You’re working to square, and then slightly round, the trailing edge. Take your hard block with 320 paper and sand the trailing edge with the block perpendicular to the edge. You are squaring this edge. Be careful and wear protective gloves to prevent cutting yourself on the trailing edge. The goal is to eliminate any nicks or roughness in the edge. If the edge is rough, it is like a serrated knife, and it can cut. If the edge is smooth, the chances of being cut are greatly reduced. Once the edge is smoothed with 320, proceed with the medium block and 600 and 1200 paper. You’ll know you’re done when the edge is smooth and slightly rounded over. Never sharpen the edges of your foil! Sharp edges are dangerous and have no performance benefits at all. Again, the trailing edge should be squared, and then slightly rounded over.

The wing is by far the most important part of the foil to sand, but it is worthwhile to sand the stabilizer as well. The strut should also be done if it’s composite (carbon) but I don’t recommend sanding an aluminum strut.
A properly sanded foil feels entirely different and much improved. Ideally, you’ll be a lot more careful with it, now that you know how much work goes into smoothing it.
I have some videos on youtube on how to do this work. You can find them by searching on YouTube for Delta Hydrofoil. If you’re not confident doing this yourself or don’t have an appropriate work space, a local board builder may be able to do it for you.
Happy foiling, and keep it smooth!